Invest In A Wardrobe That Works!!!!

Dollars

We’ve All Been There

We’ve all been there. We have a closet overflowing with clothes and NOTHING to wear. Every one of those outfits were exactly what you wanted when you went shopping but you forgot to buy something for today’s event. There are certain events that we go to so seldom that they slip our minds until they arrive. There are other areas of our dressing that aren’t all that interesting for us when we are shopping but occur frequently in our schedules.

So often, when we are shopping we are guiding ourselves one of two ways. We are either browsing to find whatever excites us at that moment or we have that event staring at us and need to find something – anything – to wear. Neither lends itself to a useful cohesive wardrobe.

Balance

I suggest looking at your wardrobe as an investment and selecting pieces that fit into the overall structure of your life – giving you what you need when you need it. Create a balanced wardrobe.

How To?

It all starts with making lists.

Make a list of all the places you go and all the occasions that you need your wardrobe to fit. Take that list and decide what percentage of your days (and ensembles) are spent in each occasion. Do you need formal evening attire two or three times a week or once a month or that occasional annual event? How often do you go to events that need that “little black dress”? Do you go hiking and exploring out of doors every weekend on only the occasional group expedition? Give each occasion a percentage. Be sure they all add up to 100% or something is out if whack.

How Does It Fit the Wardrobe?

Now go look at your wardrobe. Do the same percentages apply to the outfits in your closet? Or is it out of whack? Do you spend 50% of your time in dressy business occasions and only 30% of your wardrobe. Do you need casual business outfits 4 times a week and only own 4? – doesn’t allow for much variation! Are you totally missing that little black dress and will need to go emergency shopping for that once a year occasion? Emergency shopping often means buying something that doesn’t really match your look or enhance your body shape. Make a list of what is missing.

Informed Investment Shopping

Armed with this information, the next time you go on your browsing clothes shopping trip you will have some idea of what would be the better investment in your wardrobe. More importantly, once you have done your shopping you won’t face that panic of looking in your closet and finding nothing to wear?

Like Some Help?

If your find making a list of what kinds of clothes you need in your wardrobe a bit daunting, I can help. The Lifestyle questionnaire in the Shop will quiz you about how you spend your time. After analyzing the results, you will receive a wardrobe list of the essentials you need in your wardrobe to cover every aspect of your lifestyle.

Join me in more discussion of body shapes on my website, IstinaDesign.


Facebooktwitterpinterestlinkedin

There are no comments right now.


What To Do With Those Salt Encrusted Boots (and Shoes)

How-to-fix-salt-stains-on-leather

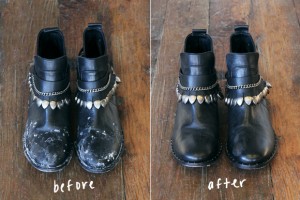
Well, winter has set in and it is time for a short DIY. Salt is wonderful in helping prevent falls on the ice and snow of winter but a killer on those expensive boots that look dynamite on you. What to do?

Leaving the salt on the boots can damage them over time so it is a godd idea to clean them at least once during winter and again when the salt is gone in the spring.

Step One – Supplies

Here is a list of what you will need to clean those boots:

-Brush for the boots.

-soft if the leather is not suede

-for suede boots(those soft ones that change color depending on how you brush the leather) go for a suede brush

-Spray bottle

-Vinegar

-soft cloth dampened with clean water

-Towel

-Hair conditioner – ONLY FOR NON-SUEDE BOOTS!

-Leather boot waterproofing spray if you want to minimize future salt problems

Step Two – Brush, Brush, Brush

Brush off the boots well. This will remove any big chunks of dirt and debris as well as a lot of the surface salt. This makes it easier to get to the salt that has soaked into the boots.

Step Three – Vinegar and Water

Mix equal parts of vinegar and water in the spray bottle. Shake it up and spray the mixture on the boots where the salt stains are. On suede boots, you may need to use your brush to get all of the stains off. Then using the towel buff the boots to remove the imbedded salts.

Step Four – Wipe Well

Wipe the boots well with a damp cloth of clean water to remove any excess vinegar. Vinegar is necessary to release the salt stains but will also dry out the boots if left on.

Step Five – For NON SUEDE BOOTS ONLY!!

You can replenish the moisture lost in your NON-suede boots by lathering on some of your hair conditioner. Lather on and wipe clean. Your boots will love it.

Step Six – Last But Not Least

If you want – spray your newly cleaned boots with some leather waterproofing spray. This will help reduce the amount of salt stains you will gather on your boots in the future.

There you have it in six easy steps! Clean beautiful boots.

Want More?

For more information on empowering you and your wardrobe check out some of my other blogs at IstinaDesign 

Facebooktwitterpinterestlinkedin

There are no comments right now.


Be Your OWN Color Stylist

color-wheel


An Experts Opinion

If you feel you need an expert’s opinion, find a color analyst and spend the money to have your colors done. Having done that, if the colors don’t appeal to you, don’t be surprised. Color analysis is not an exact science. I have worked with many women less than happy with their clothes only to discover that their color analysis was wrong and their problems were solved by returning to the colors that appealed to them.

You DO Know Best
You are the best analyst of what does and does not look good against your face – you’ve live with it the longest! Spending a couple hour playing with colors is the best to determine what color scheme works best for you. You will often find that it is not the actual colors you select but rather the tones/hues of the colors that work or don’t work. So find the colors that appeal to your personality the best and check out what shades and hues of those colors look the best

Do The Analysis
Make a trip with a close friend or someone versed in the color arts (painter, jewelry designer, interior decorator,a friend that dresses like a million, etc)and a mirror to a fabric store. Stroll the aisles and drape various solid colored fabrics around your shoulders and see what makes your face the most vibrant. You will see a pattern emerging.

Color Seasons
Summer

Pastels and light colors. Navy and off-white look great. Pure white looks icy and not the best. Denim looks great. Except for orange, that makes you look sick, just about any color in the pastels looks great.

Great neutrals are navy, off-white and a grayish brown.

Rule of thumb: Stay light and pastel like the late summer afternoons.

Spring

Bright vivid colors look best against your face. Bright medium hued colors look great. Often patterns that work will have bright colors on a black background. Periwinkle blue or blue purples look great as do peaches and melons.

Great neutrals are off-white, white, black, light navy, and yellow browns.

Rule of thumb: Follow springs lead with all the bright colors of blossoming flowers.

Autumn

Earth tones and the colors of fall. Navy blue and aqua work well. Mixing yellows into the primary colors and softening them slightly works the best. You will like yourself better in gold rather than yellow. Orange looks good and melon is your ‘pink’.

Neutrals best for you are the medium shades of navy blue and a bronzy brown.

You will find yourself gravitating to a monochromatic or analogous color schemes – multiple shades of a color work beautifully.

Rule of thumb – Follow natures lead with the earth tones or autumn.

Winter 

The primary shades look best. Dark red and navy look good next to your face. Pastels make you look faded. Give them an icy, shimmery white tone or overlay them with white lace and they look great. Dark pink or salmon gold work nicely as do forest greens. Black/white combos work for you. They are more than neutrals to you – they are colors. The colors you like are the ones that stand out in a crowd. That is part of your color personality.

You gravitate to a two color theme. Adding an additional color loses the drama.

Neutrals are where you will shine. Dark gray with a touch of silver or the reverse. Navy and dark brown. And, always, black and white.

Rule of thumb – Like the season, pure, clear, and intense.

A Little More Exploring

If you want to explore a little more about color and get a color sample card to keep with you when shopping head over to the IstinaDesign Shop and check out the Understanding Color Module on sale there.

Have Fun

Enjoy the process and find the inner you!

Facebooktwitterpinterestlinkedin

There are no comments right now.


Coats for All Shapes, Body Shapes that is.

5 body shapes and the right coat

Coats for body shapes

Winter is Here!

Winter is here now and most of us are spending a large part of our lives in coats.

Now that you understand your body shape the next question is “What is the best coat for me?”. Here are the five basic shapes and the best coat silhouette each one.

Sassy Gal (aka inverted triangle) Body Shape

Your broad shoulders give you a great natural posture and make coats look great on you. The object is to create more of a curvy silhouette. Choose a fitted and belted jacket. Big flap hip pockets add to the look you are going for. Don’t get carried away with fancy or oversized collars – stay classical. Going with a small check pattern will also draw attention away from the shoulders and add to the overall look you want.

Lady Diva (aka hourglass) Body Shape

You have the shape everyone is going for just don’t lose it in the bulkiness of the coat. Keep the coat a fitted one with a v necked collar. Emphasize the v neck and wear your coat with the collar button open – use a scarf to keep your neck warm. You can sport the hip pockets and wide collar – just as long as the waist is fitted snugly. Don’t chop yourself in half with a tie belt. It will trash your silhouette. If you wear a belt make it a buckled one over a fitted coat.

Earth Goddess (aka apple) Body Shape

If it is warm enough you can still employ the Rule of Thirds and leave your coat open down the front. Otherwise, look for a coat that has a pattern or design going down the center front of the coat (perhaps even around the neck in a shawl collar. Keep the elements simple and steer away from big lapels – a lapel less duster style coat works best on you. Add a long scarf hanging around your neck and traveling down your center front to break up your torso into those thirds. You can sport simple beautifully

Lady Peacock (aka pear) Body Shape

Like everything else in your wardrobe, you along can play with all the unique and different collars and lapels around. The funnel shaped collar is carried off best by you as are huge lapels and double ones. Wear all the scarves in all their unique ways that you want. With all your focus on the face and shoulders just let the coat skim your waist and hips and fall smoothly.

Lady of Movement (aka rectangle) Body Shape

Like the rest of your ensembles, keep it flowing. Your shape handles belted coats the best – letting the material puff out above and below the belting. Add hip pockets and dynamic lapels and you are set. Because you are usually tall for your size the three quarter length coat is best for you and keeps you in proportion.

Above all, buy a coat you love and feel great in! Dress to your likes and not to our shoulds and, above all,  have fun!


Facebooktwitterpinterestlinkedin

There are no comments right now.


What is your Bodyshape?? The answer in 3 simple steps.

What is your body shape? Previously I described the 5 body shapes and guidelines on how to dress. Next step is determining your particular shape.

That will take 3 easy steps with 3 simple measurements.

Step 1 – Prepare to measure.

In addition to a tape measure, there are a few other things you will need to before measuring.

First, leave your jeans for another occasion. They are bulky and act as a girdle.

Second, the less material between you and your tape measure the better. Lightweight garments are best. Tank top and leggings are perfect

Third, gather up your tools.

a good tape measure.

elastic. To determine where your waist is.

a mirror. This will help you find where you are measuring. A good friend would be a good substitute.

Step 2-The Measurements

Now, take that tape measure in your hands and start measuring

1- Bust. Making sure the tape measure is level with your bust across your back measure around the widest point of your bust. Do NOT pull the tape measure tight.

2- Waist. If you are not sure where your waist is, tie a piece of elastic around your waist and move around. It will settle at your waist. It is fine to pull this one a little tight. You are measuring over clothes

3 – Hips. The dreaded hip measurement is next. Hips in this context is the widest part of your body below your waist. Look at yourself sideways in the mirror to find this line and measure it. Do NOT pull tight here.

Step 3 – What Bodyshape are you?

You are a Lady Diva (aka Hourglass)  if your bust and hips are within 2 inches of each other and your waist is 7 – 8 inches smaller.

You are a Lady of Movement (aka Rectangle) if hips and bust are within 2″ of each other but waist is NOT 7 – 8″ smaller

You are a Lady Peacock (aka Pear) if hips are more that 2″ larger than your bust and waist is smaller than  bust.

You are a Sassy Gal (aka Inverted Triangle) if your bust is more than 2 inches larger than your waist and your waist is smaller than your bust.

You are an Earth Goddess (aka Apple) if waist is larger than or equal to bust.

You can be on a scale between two shape. Claim ownership of both shapes. I will clarify that on an upcoming post.

Right now, you can you can go to my website Istina Design  to read up further on what your particular body shape will look best wearing.


Facebooktwitterpinterestlinkedin

There are no comments right now.


Halloween Costumes? No Sweat!!

IMG_1481


I thought I would take a break from fashion advice to delve into something seasonal – Halloween. After taking a short trip down memory lane and the costumes we came up with when my kids were young, I took a look around the current supply of costumes generally available. As usual, they are all the same with little imagination and very one dimensional. Lets liven up life.

With a sewing machine and the most basic of sewing experience just about any costumes for small children is incredibly easy. With Halloween right around the corner, I, of course, got asked and decided to take a fun break to fulfill the costume request of a young family member. Thought it would be fun to put this DIY project in the blog.


Temporary Use

Remember, this costumes are for temporary use, doesn’t have to be perfect to create the desired effect, and only needs the most basic of fitting. (I used 2 measurements to create the requested costume.). And the thrill of a child of having such a fantasy fulfilled where they can dive into a world of their imagination makes the time constructing the costume seem insignificant. It will become a fond memory for both of you.

With the massive amounts of information available on the Internet now, it has never been easier to get ideas and how-to help from the elaborate to the most basic. If you can’t seem to find something within your skill set just keep browsing.

Two Truths

Certain truths apply to whatever creature your little one wants to be.
1st-Felt is the fabric of choice. Anything that needs any amount of body (firmness) and doesn’t need to float or flutter can be made of felt. It is easy to sew.It does NOT need to be hemmed. It does NOT ravel. It can be stitched with seams showing or not. (If seams are on the outside, just trim the felt to an 1/8” outside the seam).
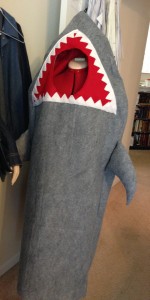
2nd-Simple is best. As long as the costume has the major feature of the creature – in my case, gaping red mouth and white shark teeth – it will be more than sufficient for little ones.

SHARK ATTACK!

So when my grandson decided after Shark Week that he absolutely HAD to be a shark for Halloween, I took to the net.

After hunting for about 30 minutes and wandering through dozens of DIY solutions here is the pattern and directions I settled on:
www.ashnola6.files.wordpress.com/2011/05/shark-costume-instructions1.pdf

Supplies

IMG_0689

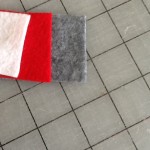
Substituting grey felt for the grey “material” gave the costume much more body and durability.

Red felt for the mouth.

white felt for the teeth completed my purchase.


Construction – Mistakes are the Greatest Discoveries!

Biggest hurdle in the construction was making, turning and stuffing the fins. Even those don’t have to be accurate just a good resemblance. Just don’t overstuff.

Before stitching the sides together I glued on the red mouth and cut and glued teeth to the ‘face’ of the shark.

I did do some additional measuring to see what size to make the oval for the face opening. Before actually cutting it out of the costume, I cut it out of a piece of paper to be sure it was the right size. I started small and kept trimming until it was large enough. Even then it came out a little large. I was upset by the he wasn’t. He quickly discovered he could wear it with his head and one arm through the too large opening and become a kid being eaten by a shark. Small mistake turned into a big plus!!

The directions called for making a pillow to strap to his head to make the point of the shark sit higher than his head. That seemed rough for an nine year old to manage so I changed the pattern and made a ‘mouth’ attached to the top of the face opening and creating a pocket for his head. Problem solved. His head fit right into the pocket and the shark stood tall.

Eyes glued on – no way. Purchased eyes worked better and were put on days later.

Have Fun

The entire costume cost a grand total of $20 and took me a Sunday afternoon to make. Give yourself plenty of time – even a number of days and above all – HAVE FUN. Perfection is an adult ailment. The love of a child for his or hers heart’s desire is a blessing to the world.

Facebooktwitterpinterestlinkedin

There are no comments right now.


Trunk Shows

To avoid the major markup that retail stores have to impose on clothing to cover the cost of retail I am using a different way to get my clothing to you - in home trunk shows. Invite a few of your [...]

Interested? >

© 2012 istina design
All rights reserved.